Files and folders tree
 The folders tree on the left of the the Files and folders page defines the layout of the folders on the target system. It is modelled after the folders tree on recent Windows versions (in particular, Windows Vista and later), but with some important differences:
- Only physical folders are shown (for example, Windows); logical folders such as My Documents (which really refers to some other folder, usually C:\Users\your name\My Documents) are omitted - although you will find its physical equivalent in the tree.
- With minor exceptions, the names of the folders mirror their counterparts on actual Windows systems. For example, Program Files represents the folder that is called Program Files on English-language Windows systems. However, during the installation of your product the names and sometimes the entire paths of automagical folders are replaced by their actual name and location on the target system.
- Some folders have a symbolic purpose and are not found literally on a Windows system. For example, the Current User folder represents the folder C:\Documents and Settings\your name on Windows XP and C:\Users\your name on Windows Vista and later, where your name is the login name of the person who is running the installation.
Generally speaking, do not change the layout of the folders tree on the Files and folders page even if you think that it doesn't match your Windows system exactly. The folders tree was carefully designed to be compatible across all Windows versions from Windows 95 to Windows Vista/7/8 and later, and will adapt at installation time to the actual situation on the target system.
It's best to consider the tree as an idealized version of the Windows folders tree and and to rely on the installer to make up any differences between the ideal and the reality of the target system.
Creating new folders is not a problem if you add them as subfolders of existing automagical folders rather than using hard-coded locations that might work on your version of Windows, but not necessarily on the customer's system.
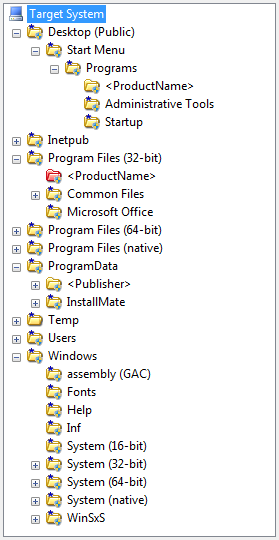
Target System tree
The folder tree starts with a root called Target System. This tree represents the folder tree of a typical Windows desktop or server system such as Windows 2000, XP, Vista, or later. Any files, folders, and shortcuts that you create in this tree will be installed on the installer's target system proper. See File attributes, Folder attributes, and Shortcut attributes for details about these installation items.
Folder icons
The icons in the folders tree provide additional information about the properties of the folders. In particular, a small UAC shield appears on the folder icon if the folder requires elevated rights for writing.
- No UAC shield: Non-elevated programs can read and write in this folder on behalf of the current user.
- UAC shield: Elevated privileges are required for writing in this folder (creating, modifying, or deleting files).
Folders with the UAC shield are effectively read-only for regular programs and require that the installer runs with elevated rights to install or remove files in the folder.
| Icon | Folder type | Access level for writing |
|---|---|---|
| Regular folder | Non-elevated | |
| Read-only folder | Elevated | |
| Automagical folder; actual folder location depends on the target system | Non-elevated | |
| Read-only automagical folder; actual folder location depends on the target system | Elevated | |
| Primary folder; used as main product folder | Non-elevated | |
| Read-only primary folder; used as main product folder | Elevated | |
| Primary folder that is also an automagical folder | Non-elevated | |
| Read-only primary folder that is also an automagical folder | Elevated |
Commands
You can issue file- and folder-related command from both the folders tree and the the folder contents list. Furthermore, some of the commands on InstallMate's main menu bar and its toolbar also apply.
To issue a command, select the folders, files, or shortcuts to which the command must apply, then do one of the following:
- Right-click on one of the selected items and choose the command from the popup menu that appears.
- Click on the toolbar button that corresponds to the command that you want to issue.
- Click on the Context menu button
 in the title bar of the attributes pane and choose the command from the popup menu that appears.
 - Choose the command from InstallMate's main menu bar.
Drag & drop actions
You can use drag & drop to move files and folders within the folders tree. You can also use drag & drop between Windows Explorer and the InstallMate folders tree to add new files and folders to the project.
The following drag & drop actions are supported on the Files and folders page:
| Action | Keyboard modifiers | Effect |
|---|---|---|
| Drag & drop with Left mouse button | (none) | Moves the selected objects to the drop point. |
| Ctrl | Copies the selected objects to the drop point | |
| Shift | Moves the selected objects to the drop point. | |
| Ctrl+Shift | Creates shortcuts to the selected objects at the drop point. | |
| Drag & drop with Right mouse button | (ignored) | Displays a popup menu at the drop point with the options Copy Here, Move Here, Create Shortcuts Here, and Cancel. These options allow you to choose one of the actions documented above. |
Related topics
File, Folder, Shortcut, Installing Files, Installing Shortcuts, Working with project pages