How to let the user to change the program group name
![]() This help topic refers to a previous version of InstallMate. It has not been updated for InstallMate 9 yet.
This help topic refers to a previous version of InstallMate. It has not been updated for InstallMate 9 yet.
By default, an InstallMate project includes two folders that represent the All Users and Current User program group of your product, respectively. These folders are used to install shortcuts that appear on the Windows Start > All Programs > ProductName menu.
In most cases, the defaults are perfectly acceptable. However, if you want to allow the user to choose a different name for the program group instead of the default ProductName, then you must make some changes to your InstallMate project.
Tip: If you simply want to use a different hard-coded name than ProductName, then all you need to do is replace the <ProgramName> folder names under All Users\Start Menu\Programs and Current User\Start Menu\Programs on the Files and folders project page by a name of your own choosing.
Recommended procedure
 Allowing the user to change the program group name during installation requires the addition of an EditText control to one of the dialog boxes. This control is used to set the value of a new variable <ProgramGroup>, which in turn is used as the name of the program group folder.
A sample project that implements the procedure below is available from our web site:
The following steps illustrate how this can be accomplished.
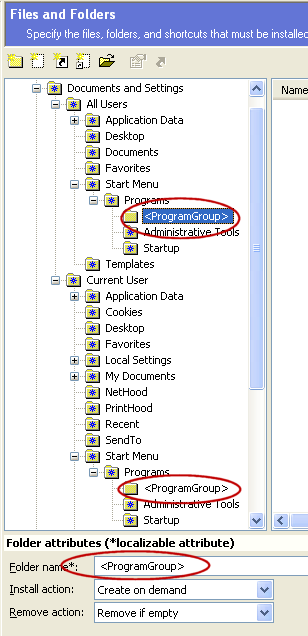
- On the Files and folders project page, rename the <ProductName> folders under All Users\Start Menu\Programs and Current User\Start Menu\Programs to <ProgramGroup>, a new variable that we'll create later (see screen shot). Note that the folder Alias fields do not change; they remain CommonProgramGroupFolder and ProgramGroupFolder, respectively.
On the Variables project page, create a new variable and set its attributes as follows:
- Name: ProgramGroup
- Value: <ProductName> (or your preferred default value)
Rest as per default.
On the InstallMate - Dialogs project page, create a new dialog. It's easiest to copy an existing dialog, for example OptionsDlg2:
- Select OptionsDlg2
- Press Ctrl+C
- Press Ctrl+V
- Rename the second OptionsDlg2 to ProgGroupDlg.
In the new dialog (assuming that you copied OptionsDlg2), make the following changes:
- Delete the Browse button, and the Required disk size, Available disk size, and 0 KB (2 x) static texts.
- Change the Installation folder: label to something like Program group name:.
- Select the FolderEdit EditText control and change its Symbol name to ProgramGroup, then clear its Indirect box.
- You may want to change a few other items in the dialog box, such as the page subheader to explain what the dialog box is for.
- Click on the Event handlers tab and delete the BrowseBtn:OnClicked handler that you see at the top.
- Select the OptionsDlg dialog box (assuming that you use the default dialogs), and change the caption of the Install button to Next >.
- Still in OptionsDlg, click on the Event handlers tab and delete the NextBtn:OnClicked handler that you see.
- On the Actions project page, select the UIFirstInstall sequence.
- Right-click in the sequence, then choose New Action > Run Dialog. Move the new action (RunDialog15) up (Ctrl+Up) until it appears between OptionsPage and ProgressPage.
Change the RunDialog15 attributes as follows:
- Action name: ProgGroupPage
- Dialog name: ProgGroupDlg (click on the ... browse button and select the dialog box)
Rest as per default.
- Rebuild your project.