Menus and toolbars
InstallMate Builder contains dozens of menus and toolbars with commands that enable you to perform actions on your installation project and its contents. You will find menus and toolbars in the following places:
The remainder of this topic discusses these menus and toolbars and the ways to access them. For a full list of all commands in InstallMate, see Command reference. For a list of keyboard accelerators, see Keyboard shortcuts.
Tip: To get an explanation of a command, open the menu on which it appears and press the F1 key.
Main menu bar
The main menu bar is the most obvious one: it runs across the top of the InstallMate Builder main window, just under the title bar. It contains project-wide commands such as the File commands, the Project commands, and the Help commands.
To access the commands on this menu, you can use the following methods.
- Mouse: Click on the top-level item to drop down the submenu, then select the desired command. Some submenus have further sub-submenus that are indicated by a small triangle:
 . In those cases, more commands are available by clicking on the submenu item. To dismiss the menu without executing a command, click somewhere outside the menu area or press the Esc key one or more times until all menus are closed.
 - Keyboard: Press and release the keyboard shortcut associated with the command. This shortcut is shown on the menus to the right of the command's name. Not all commands have a keyboard shortcut.
- Keyboard: Press and release either Alt key, then use the cursor keys or press the underlined letter of the desired menu or menu item. To dismiss the menu without executing a command, press the Esc key one or more times until all menus are closed.
- Keyboard: Press and release the F10 key, then use the cursor keys or press the underlined letter of the desired menu or menu item. To dismiss the menu without executing a command, press the Esc key one or more times until all menus are closed.
See the following topics for a list of the main menu commands: File | Edit | View | Project | Format | Navigate | Help
Context (popup) menus
Each project item in your InstallMate project has its own private menu. (These menus are usually called popup menus because they pop up over the item in question, or context menus because their commands apply only in the context of that particular item.)
To access an item's context menu, use one of the following methods:
- Mouse: Right-click on the item in the list or tree in which appears. The item's context menu appears and you can select the desired command. To dismiss the menu without executing a command, click somewhere outside the menu area or press the Esc key.
- Keyboard: Press and release the Shift+F10 key combination, then use the cursor keys or press the underlined letter of the desired menu item. To dismiss the menu without executing a command, press the Esc key.
You can also open the item's context menu by clicking on the context menu button ![]() in the title bar of the item's attribute pane:
in the title bar of the item's attribute pane:

See Project item commands for a full list of context menu commands.
Specials menus
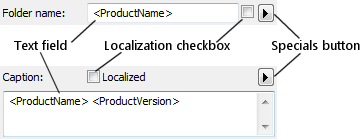
Specials menus contain commands to insert symbolic variables or other special text strings into a text field. It appears when you click the ![]() button to the right of a text field:
button to the right of a text field:

Each menu contains commands for the special text strings that are most relevant for the associated text field. When you select one of the special menu items, the corresponding text string is inserted into the text field at the caret position. If any portion of the text field was selected before you opened the menu, the entire selection is replaced by the new text.
See Specials menu commands for a full list of the specials menus commands.
Main toolbar
The main toolbar runs underneath the main menu bar near the top of the InstallMate main window:

It contains buttons for the most common commands from the main menu. It also contains a drop-down list that selects the current display language for localized text and other resources in your project, and a drop-down list that selects the default build package. (The default build package is the one that is built if you press the F7 key.)
Tip: To discover which command a toolbar button represents, point the mouse cursor to it (without clicking) and hold it there. After approximately 0.5 seconds, a small tooltip appears that shows the command name, plus any keyboard shortcut associated with the command.