How to install MSDE 2000
![]() This help topic refers to a previous version of InstallMate. It has not been updated for InstallMate 9 yet.
This help topic refers to a previous version of InstallMate. It has not been updated for InstallMate 9 yet.
MSDE 2000 (Microsoft SQL Server 2000 Desktop Engine) can be installed as part of your overall installation. The current article explains how to do this. It uses a sample InstallMate project that can be downloaded from the Tarma web site:
Information about the MSDE 2000 redistributable (including its system requirements and licensing terms) can be found on the Microsoft web site as How to obtain and install SQL Server 2000 Desktop Engine (MSDE 2000).
MSDE 2000 installer cannot be run from Windows Installer package
The MSDE installer provided by Microsoft uses Windows Installer (MSI) to install itself. As a result, it cannot be launched from another Windows Installer package; it must be run separately and Windows Installer must not be active while the MSDE installer runs.
The topic How to install MSDE by using the Windows Installer on the Microsoft web site explains this and suggests two alternative solutions:
- Make sure that MSDE is already installed on the target system; or
- Install MSDE before you run your own installer. This requires another program that wraps these two installers (MSDE and your own).
The first alternative is not really a solution if MSDE is not already present, so we will concentrate on the second approach.
Installing MSDE with InstallMate
To install MSDE 2000 from an InstallMate (i.e., non-Windows Installer) package involves the following steps:
- Obtain the MSDE redistributable from Microsoft
- Add the MSDE files to your InstallMate project
- Run the MSDE installer during installation
- Optional: Add your own installer
- Clean up the temporary files
- Finishing touches
1. Obtain the MSDE redistributable from Microsoft
The MSDE redistributable is available from the Microsoft web site under this URL:
http://www.microsoft.com/downloads/details.aspx?familyid=413744D1-A0BC-479F-BAFA-E4B278EB9147
- Download the MSDE2000A.exe file (or more recent) from this web site and store it on your computer.
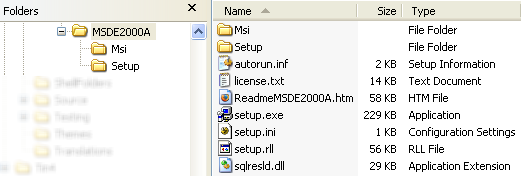
- The MSDE2000A.exe file is a self-extracting archive. You must unpack the files in this archive by running MSDE2000A.exe and specifying a destination folder. We recommend that you unpack the files to a new folder somewhere near your InstallMate project. In the example below, we have unpacked the files to a new folder called MSDE2000A (please note the two subfolders under MSDE2000A):
- Read the information in the file ReadmeMSDE2000A.htm. It contains important tips about the MSDE prerequisites and the installation procedure.
2. Add the MSDE files to your InstallMate project
Next, you must add the MSDE files to your own InstallMate project, so they will be available during installation.
- Open your InstallMate project and go to the Files and folders project page.
- Open the Temp folder and right-click on the <SessionID> folder underneath it.
- Choose Add Files from Disk... from the popup menu. This opens the Add Files to Project dialog box.
- Open the MSDE2000A folder (or whatever you called it) in the Add Files to Project dialog box. You should now see the first-level files and the two subfolders. In the dialog box, click Reset filter, then check the Include Setup files box, the Include subfolders box, and click Add with filter.
- The Bulk Import dialog box appears. In this dialog box, make sure that Assign to per-folder component is selected, then click OK.
- The files are now added (recursively) to the <SessionID> folder and are assigned to three different components: PreinstallFolder, Msi_xxxx and Setup_xxxx, where the xxxx parts are semi-random numbers.
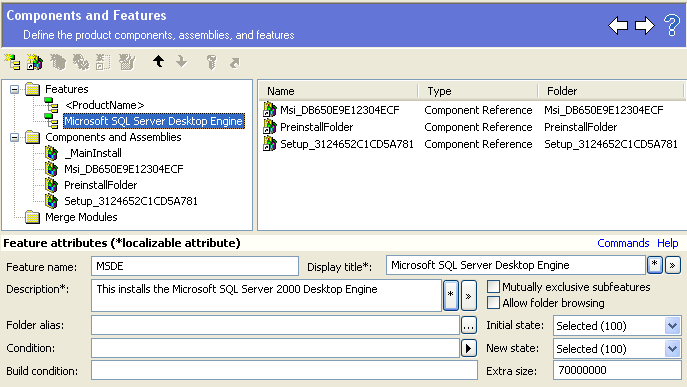
- Go to the Components project page and create a new component, then set its attributes as shown below (in particular, set its Component name to MSDE; see Component attributes for details):
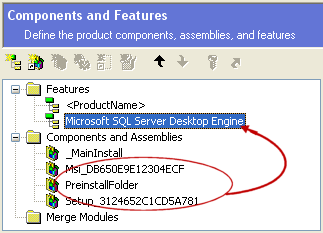
- Add the MSDE-related components (under the heading Components and Assemblies) to the new feature. You can do so by dragging the components with the mouse to the MSDE feature and dropping them there:
- Add a condition to the MSDE feature so it will not be installed if MSDE is already present on the target system:
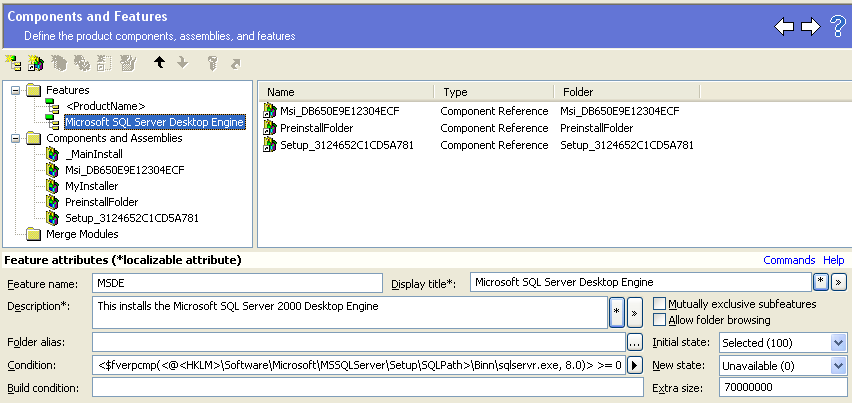
The Condition field uses the $fverpcmp runtime function to test for the presence of SQL Server 8.0 or later on the system. In that case, the feature is made unavailable. The location of the sqlservr.exe executable is obtained through a registry lookup under HKEY_LOCAL_MACHINE\Software\Microsoft\MSSQLServer\Setup\SQLPath. The full conditional expression is:<$fverpcmp(<@<HKLM>\Software\Microsoft\MSSQLServer\Setup\SQLPath>\Binn\sqlservr.exe, 8.0)> >= 0
3. Run the MSDE installer during installation
For the actual installation of MSDE, you must add a custom action to your InstallMate project that runs the embedded installer. The procedure for this goes as follows.
- Go to the InstallMate - Actions project page.
- Right-click on the MainInstall action sequence and select New Action > Run Program from the popup menu.
- Move the newly created Run Program action up in the list (you can use Ctrl+Up for this) until it appears immediately after the InstallFiles standard action.
- Set its attributes as shown in the following screen shot:
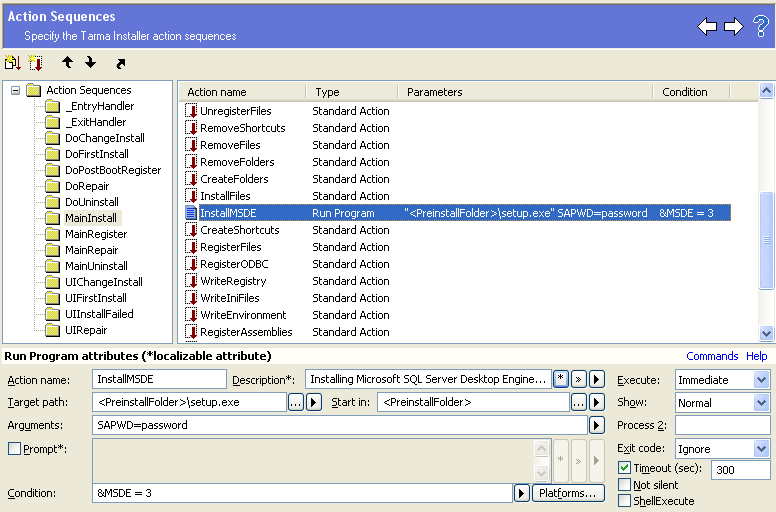
- Adjust the Arguments field as required. In particular, you must specify SAPWD=...password... (choose your own password here). For additional arguments, please consult the ReadmeMSDE2000A.htm file that is included in MSDE2000A.exe (see above).
4. Optional: Add your own installer
The previous steps take care of installing MSDE on the target system, if necessary. Depending on your installation scenario, you might also want to install your own application. We will discuss two common cases: installing your own application as a Windows Installer (MSI) package, and installing your application as an InstallMate native package.
4a. Install your own application from a Windows Installer package
If you have an installer for your own application as a Windows Installer (MSI) package, you can add it to the current project and install it after MSDE. This allows you to distribute a single package that contains both the MSDE installer and your own application.
To install an MSI package from the same project, follow these steps:
- Add your .msi file to the same Temp\<SessionID> folder on the Files and folders project page as the MSDE files described earlier.
- Right-click on the new file, choose Assign to Component... from the popup menu, then create a new component in the Select Component dialog box that appears and click Select to assign the new file to this component.
- Go to the Components project page and assign the new component to at least one of the features using drag & drop. Do not assign the component to the MSDE feature created earlier - that feature is not available if MSDE is already present on the target system!
- Go to the InstallMate - Actions project page.
- Right-click on the MainInstall action sequence and select New Action > Run Program from the popup menu.
- Move the newly created Run Program action up in the list (you can use Ctrl+Up for this) until it appears immediately after the InstallMSDE action created earlier.
- Set its attributes as shown in the following screen shot:
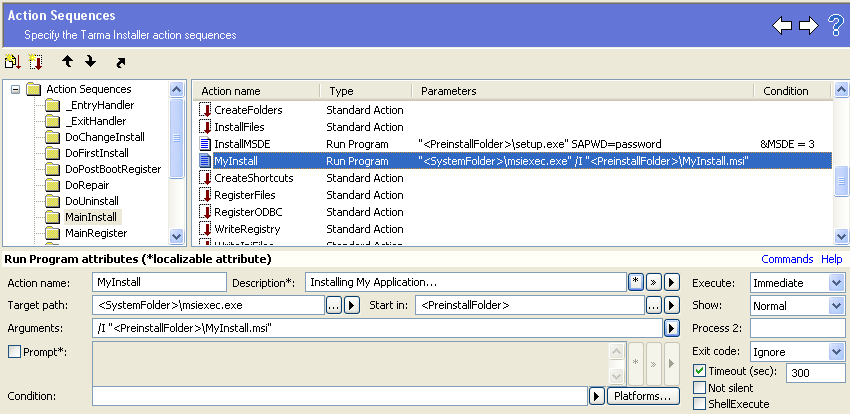
Note: You must adjust the Arguments field so it refers to your own .msi file instead of the fictitious MyInstall.msi.
4b. Install your own application as an InstallMate package
If you want to install your own application with InstallMate, you can simply extend the sample project discussed in this topic and use it as a normal installation project. Add the files, shortcuts, and any other settings as you normally would; as long as the MSDE elements discussed in steps 2 and 3 above remain intact, the installer will behave as expected.
5. Clean up the temporary files
The final step consists of cleaning up the MSDE installation files after use.
- Go to the InstallMate - Actions project page.
- Right-click on the _ExitHandler action sequence and select New Action > Run Script from the popup menu.
- Set its attributes as shown in the following screen shot:

6. Finishing touches
To round off your installer, you might want to consider the following.
- If you want to run the installer always in quiet mode (without user interaction), then go to the Build project page, select the Package, and add /q to its Default args attribute.
- If you use the installer only to install MSDE (and perhaps a your own application from a separate MSI package), then you do not need the uninstaller that is registered by default. To prevent registration of the uninstaller, go to the Installer options project page and set the Uninstaller attribute to Don't register.
- If you want to uninstall MSDE as part of the overall uninstallation process (this is not recommended), then you can add an Uninstall Product action to the MainUninstall action sequence on the InstallMate - Actions project page. The MSDE Uninstall key is {E09B48B5-E141-427A-AB0C-D3605127224A}.