Topic contents
Attribute panes
An attribute pane displays the attributes of the currently selected project item and allows you to edit those attributes. Attribute panes appear at the right side of the InstallMate main window.
- If more than one project item of the same type is selected, the attribute pane applies to all selected items. This allows you to change the attributes of several items at once.
- If several project items of different types are selected, the attribute pane is replaced by a "No attributes" placeholder and no attribute editing is possible.
For a list of all attribute panes, see Alphabetical reference.
Title bar

All attribute panes have a title bar that displays the item's type name, plus buttons to access the item's help topic and context menu; see the screen shot below. Clicking these buttons opens the help topic associated with the current item or the item's context menu with commands that apply to the currently selected item, respectively.
Tip: You can also press F1 at any time in InstallMate to get context-sensitive help.
General attribute editing
Most attribute fields are standard Windows controls, such as text fields, check boxes, and drop-down lists. These work the way that you are used to in other Windows applications. In addition to these standard controls, attribute panes also offer the following special features:
- Specials button: Many text fields have a
 button to their right. Clicking this button opens a popup menu that displays a list of special text strings for insertion into the text field. For the full list of available commands and text strings, see Specials menu commands.
 - Browse button: Some text fields have a
 button to their right. Clicking this button opens a dialog box that allows you to browse for a file, folder, or other project item whose name or path will be inserted into the text field.
 - Localizable text fields: Some text fields contain localizable text. For more information about these fields, see Working with localizable attributes below.
Using symbolic references in text attributes
In general, you can use symbolic references such as <ProductName> or <#file_alias> in any text attribute. InstallMate allows symbolic references virtually anywhere and resolves them at installation time, just before the text attribute will be used. This applies to attributes of installation objects, for example file names and registry value names and data, but also to user interface elements such as dialog control captions.
Working with localizable attributes
Localizable text attributes represent text fields that can be localized (i.e., translated into different languages). A typical localizable text field looks like one of the following:
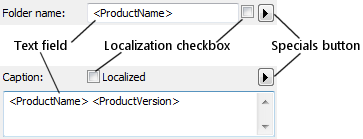
The upper text field (Folder name) shows the compact version of a localizable text field; the lower text field (Caption) shows a full text field.
- The Localization checkbox determines if the attribute is really localized; its function is explained later.
- The Specials button opens the Specials menu as explained earlier. The first menu item is Edit Localizations..., which opens the Edit Localized String dialog box that gives access to all translations of the text at once.
Localizable text implementation
To edit localizable text attributes effectively requires an understanding of the way InstallMate implements them. Internally, InstallMate maintains several pieces of text for each localizable text attribute:
- A default text string that is used if no translation is available for a given language, or if the attribute is not localized at all;
- Separate per-language text strings for each language that has a translation.
For example, the Web site label that appears on some installer dialogs may be represented internally as:
default: "Web site"
   0406: "Hjemmeside"
   080A: "Sitio Web"
In this case, InstallMate would display and use Hjemmeside for Danish (language ID 0406) and Sitio Web for Spanish (language ID 080A), but use the default text Web site for all other languages because there are no translations available for them.
Tip: The Edit Localized String dialog box shows the default text and all currently defined localizations for a localizable text attribute in one place and allows you to edit them in parallel. You can open this dialog box by clicking on the ![]() button to the right of the text field and choosing Edit Localizations...
button to the right of the text field and choosing Edit Localizations...
Editing localizable text
Localizable text attributes are just that - localizable. They may, but do not have to be localized; for example, installation file names are localizable in principle but are rarely localized (i.e., translated) in practice. Shortcut titles are more often localized, but it's the installer's user interface that contains most localized text: its Setup dialogs and messages are almost always localized.
Whether or not a localizable text attribute is really localized depends on the state of its Localization checkbox shown earlier. If this button is shown sunken, the attribute is localized and will accept translations for each project language; if the button is popped up, the attribute is not localized and only the default text is available.
If you type text in the text field of a localizable attribute, one of the following happens:
- If the attribute is localized (Localization checkbox is checked), the text that you type is stored in the attribute's language-specific text string. If the attribute does not yet contain a translation for the current language, a new language-specific text string is created automatically.
- If the attribute is not localized (Localization checkbox is cleared), the text that you type is stored in the attribute's default text string. In this case, the attribute behaves the same as a non-localized text attribute.
All language-specific editing in a localized text attribute (i.e., an attribute with a checked Localization checkbox ) is done for the current display language. This language is shown in InstallMate's main toolbar:

To edit text in a different language, select the desired language from the language drop-down list. All localized text attributes will change to display their translations for the newly selected language, and any editing affects the translations for this language, while leaving the other translations and the default text strings alone. (For non-localized text attributes, the default text strings are edited.)
Tip: If you want to use a language that does not appear in the drop-down list, go to the Languages project page first to add the new language. After adding the new language, it can be selected from the drop-down list.
Example: Adding a translation
To add a translation to a localizable text attribute, select that language on InstallMate's main toolbar, then type the text for this language in the localizable text field. Make sure that it is indeed localized: its Localization button must appear sunken.
For example, if we select Italian as the current project language (language ID 0410) and then type the Italian translation for Web site, the localized string for the Web site label will change to this (note the new text string for language 0410):
default: "Web site"
   0406: "Hjemmeside"
   0410: "Sito Web"
   080A: "Sitio Web"
The new text string for language 0410 is added automatically; the other text strings are left unchanged.